|
|
How to crack a Pacman
Plus!
| For those of you that are unfamiliar with
Pacman Plus (I sure was), it was an
"official" upgrade to Pacman that was
meant to make the game more challenging and more
interesting. There's some cool twists-- eating a
power pill may or may-not change all the ghosts
to be vulnerable, eating the fruit makes the
ghosts disappear (but be vulnerable), on higher
levels the maze disappears, new graphics, etc. Bally/Midway
didn't want their new version to just be a ROM
replacement though, so they built a special
upgrade. The upgrade uses a daughtercard that
plugs into the Z-80 socket and then uses
encrypted ROMs to prevent people from duplicating
the upgrade without the special hardware from
Bally/Midway.
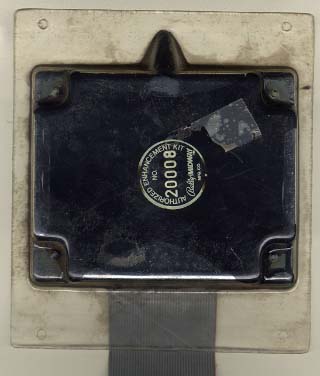
They really didn't want people to get
into this thing. It's encased in a sheet of
plexiglass filled with epoxy-potting compound.
One way or another I needed in there to decrypt
the ROMs to help with a MAME emulation of the
hardware...
|
 |
 |
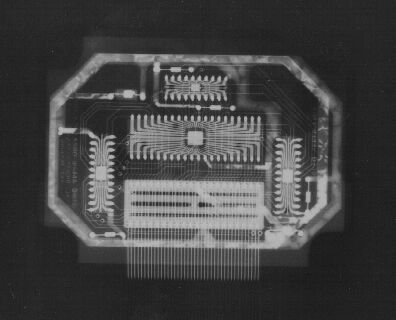
First off I wanted to know what I was dealing
with. This was relatively simple to accomplish
with some help from our dog's vet. (Always good
to know where you can find an x-ray machine...)
The x-ray revealed four chips-- presumably a
Z-80, two PALs, and a buffer. The PALs looked to
be something similar to a 20x10 type
architecture, but from the early 80's. The exact
type wouldn't really be important if my plan
worked as I hoped. The x-ray let me trace out
most of the circuit (which was verified with Dock
Cutlip who'd had a look as his own Pacman Plus
module before). The pinout of the main chip
seemed to be a stock Z-80, with the databus
interrupted and routed through PAL1. Looks like
PAL1 scrambles datalines based on 8 possible
combinations or passes data directly through to
the Z-80. PAL2 looked like a fancy address
decoder. It was obviously scrambling data
depending on address.
|
| This was very good news for my plan... The
PALs of the day didn't have much for internal
latches, and the pinouts of the two in the epoxy
seemed to suggest combinatorial inputs and
outputs only. The "buffer" chip was too
big to be a latch (and didn't match up any
pinouts) so I figured it was a 74LS244. Now to
get in there and get at the Z-80 so I can read
the code... A Craftsman "Robogrip"
plier made short work of the plexiglass...
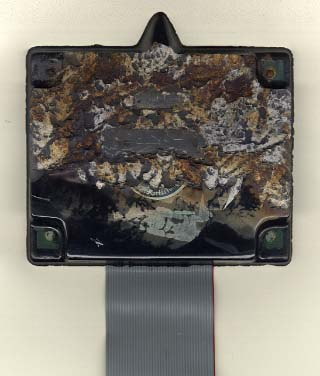
...but, let me say that that epoxy crap
is impressive. Hard as hell. "Fine," I
thought. I'll dissolve it. Turns out it's
impervious to Methyl Ethyl Ketone (although it
was really "clean" after trying).
"Fine," try again. Meet
"Jasco" epoxy paint stripper. That
actually let me get off about 1/1000" after
about 20 minutes of trying. Bastards.
Can't use fuming NHO3 'cause it'd eat the tops
off the chips... "Fine," time for the
brute-force approach...
Blow torch. Heat evenly, scrape off with a
putty-knife. Success!
|
 |
 |
With the top of the Z-80 and the 74LS244
exposed I was then able to take a Dremmel to the Epoxy
From Hell. The stuff ate two carbide
cutting bits in a matter of seconds! I switched
to a "cut-off" wheel that worked much
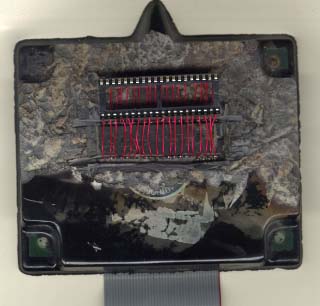
better. I cut down to the Z-80, exposing the
pins. Once there I moved in on the chip and cut
through the leadframe. That effectively left me
with a "header" into the PCB. Forty
small pieces of wire and a socket later I had a
socketed Pacman Plus "blob". Cool.
In goes the Fluke 9010A microsystem
troubleshooter... I wrote a program on the Fluke
to step through all of ROM memory and dump it to
the serial port in ASCII. A laptop captured the
data which I dropped into Excel and pasted into a
text file. Once I had a complete text file I
wrote a short 'C' program coverted the text to
binary and rebuilt ROMs.
|
| Once the ROMs were rebuilt, I
removed the original Pacman Plus board and
EPROMs, replaced the ROMs with my (now) decrypted
ones, and dropped in a stock Z-80. Fired up the
game and... It worked! |
Thanks go to TomW, Kev, and Dock for supplying the
boards, EPROM images, and support!
Updated: 5/14/2000
|